
Network Bridging explains the procedure grabbed from network devices to allow two or more connection networks, and two or more networks types which linking the networks to create an amalgamated network. Here will be explained how to set Transparent Bridge with Mikrotik version 2.96, and before start you should have Mikrotik installed on your PC.
First login to your Mikrotik box, and on New Terminal type:
[Admin @ MikroTik]> interface bridge add name=bridge1 disabled=no arp=enabled
alternatively if you decide to login via winbox, see image below:
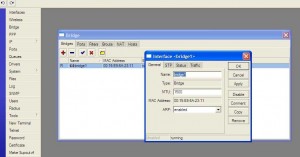
This command will be create bridge with name bridge1
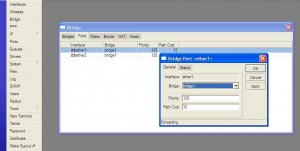
Second step is connecting Ethernet card into a bridge, here we use two Ethernet card which call ether1 and ether2, go type on your winbox terminal:
[Admin @ MikroTik]> interface bridge port set ether1 bridge=bridge1 priority=128 path-cost=10

[Admin @ MikroTik]> interface bridge port set ether2 bridge=bridge1 priority=128 path-cost=10
and via winbox will look like images below:
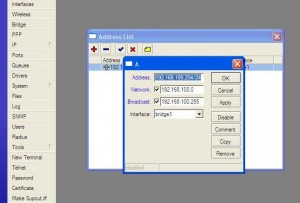
After second steps above, Ethernet card is connected with bridge device, now we have to give it Ip Address, from terminal type:
[Admin @ MikroTik]> ip address add address=192.168.100.254 netmask=255.255.255.0 interfaces=bridge1 disabled=no (remember to use your ip address on bridge interface)
Or use winbox see image below:
After all that steps above, we must do some check to ensure transparent bridge running properly, on your terminal type:
 [Admin @ MikroTik]> interface bridge print

Flags: X - disabled, R - running

0 R name="bridge1" mtu=1500 arp=enabled mac-address=00:15:E9:XX:XX:XX priority=32768 aging-time=5m forward-delay=15s garbage-collection-interval=5s hello-time=2s max-message-age=20s
[Admin @ MikroTik]> ip address print
Flags: X – disabled, I – invalid, D – dynamic
# ADDRESS NETWORK BROADCAST INTERFACE
0 192.168.100.254/24 192.168.100.0 192,168,100,255 bridge1
That all things above show you everything is run properly, now we check connected state bridge with other machine on your network, this done with ping test.
 [Admin @ MikroTik]> ping 192.168.100.10

192.168.100.10 byte ping: ttl = 64 time = 1 ms

192.168.100.10 byte ping: ttl = 64 time = 1 ms

192.168.100.10 byte ping: ttl = 64 time 3 packets transmitted, 3 packets received, 0% packet loss

round-trip min / avg / max = 0/0.6/1 ms
That’s it you now have a working properly transparent bridge.
Thank you for attention and feel free to leave comment here.
Sangat bermanfaat utk pembelajaran. Trims 🙂
Baru paham nih cara pake mikrotik yang bener, makasih infonya.
sangat bagus dan bermanfaat sekali info dan tipsnya
tips yang sangat bagus dan bermanfaat sekali terima kasih atas infonya
makasih infonya, saya jado bisa tahu cara mencsettingnya dengan mikrotik.. Lanjutkan mas Ferdy
menggunakan mikrotik di windows memang lebih mudah.
tips yang bagus. makasih
Nice tips, good Mikrotik